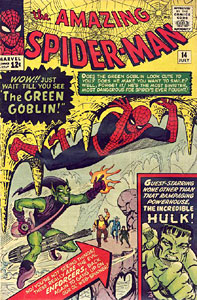
Mikey and Char-Char In Stroller

February 15th, 2010 by Matt

Mikey and Charlotte in Stroller

Toothy Grin

Mikey and Charlotte in Stroller

Sweet Faces!

Mikey and Charlotte in Stroller

Serene and Satisfied

I love this set of photos! Mikey (my son) and Char–Char (my niece) decided to sit in a stroller together. Mikey has different smiles in each photo, while Char–Char is serene and seems at peace with the world. Never mind they just finished chasing each other around Grandpa’s back yard! At the time of this photo, Mikey is 3 years, 7 months old, Char–Char is 1 year 6 months.

This photo was taken with my trusty Canon EOS 5D at 1/125 sec, F4, ISO 200, with my old Canon 28–105mm lens at 53mm. (Isn’t EXIF info great? I would never write this stuff down!) I also used fill flash using, in my opinion, the best flash attachment you can buy, the Lightsphere II - Clear, by Gary Fong. This clear bounce attachment takes all the worry and fuss away from lighting your subject and produces fantastic, flattering, well–lit people photos. Try one, you won’t use anything else!

The Lightsphere can be used for many other types of photography, too. Take a look at this series on the Thanksgiving Cactus using it.

Posted in Photography, Life and Living | No Comments »

Indiana Jones Trilogy Pixelmashes!

February 10th, 2010 by Matt

Here are links to David Court’s great work on the Indiana Jones Trilogy. Enjoy everyone!

Raiders of the Lost Ark Animated GIF

Raiders of the Lost Ark

The new year started off really well when I received a nice e-mail from David Court, of Star Wars Pixelmash fame. In a previous post, I said that I hadn’t figured out who the creator of these great Star Wars animated GIFs was. Well, David was kind enough to let me know, and now you do too!

Temple of Doom Animated GIF

Temple of Doom

David also let me know about his new Pixelmash collaborations…Raiders of the Lost Ark, Indiana Jones and the Temple of Doom, and The Last Crusade! The Indiana Jones animations are in the same familiar, although slightly taller 129 x 94 pixel format as the Star Wars offerings, and if anything, they are even cooler and more detailed in their animations. There are tons of small animated figures and even more detailed facial expressions. The opening “Raiders” scene where Indy is being chased by the natives had me cracking up!

The Last Crusade Animated GIF

The Last Crusade

Finishing the Indiana Jones Trilogy, we have the Indiana Jones and the Last Crusade pixelmash, “live and and in living color!” I love the zeppelin! Awesome job, David!

Needless to say, I’ve really been impressed with David’s efforts. Who knows what great stuff he’ll come up with next? Thanks again for the “heads up,” David!

Posted in Graphic Design, The Web, Movies, Fun Stuff | No Comments »

Star Wars Trilogy Animated GIFs!

February 8th, 2010 by Matt

Back in 2005, David Court created a sensation on the web by recreating the Star Wars Trilogy in animated GIF form. These are works of art and deserve to be kept out there for everyone’s viewing enjoyment. In that spirit, here are links to the original Trilogy, as well as some I am housing here on my website, in the spirit keeping this great web–based art available to everyone.

I’ve corresponded with David from time to time and have enjoyed our brief conversations. He is a nice guy with a delightfully sardonic sense of humor. I wish him well.

Star Wars Animated GIF

A New Hope

This is too cool for words! I found a link to this on another blog and just had to mention it. This animated GIF file contains all of the main scenes from Star Wars IV: A New Hope, all in a 168k file! Awesome! My kudos to the designer, David Court!

Empire Strikes Back Animated GIF

The Empire Strikes Back!

Another fantastic GIF animation, this time it’s Star Wars V: The Empire Strikes Back! Man, it takes a lot of work to animate something like this, especially to do it this well!

Return of the Jedi Animated GIF

The Return of the Jedi!

The final piece of the puzzle! And once again, a fantastic GIF animation, Star Wars VI: The Revenge of the Jedi! Awesome!

Posted in Graphic Design, The Web, Movies | No Comments »

View from Cerro Alto

February 4th, 2010 by Matt

Late Afternoon Morros Photo

Late Afternoon Morros

Here’s a nice shot I took in April of 2005 on a hike up to the top of Cerro Alto, off of highway 41 near Morro Bay, CA. This is the highest peak, at 2624 feet, in the area. Beautiful!

Posted in Photography | No Comments »

Photographic Proof of Global Warming

February 1st, 2010 by Matt

In 2006, I read a disturbing article in the January/February issue of Sierra magazine entitled “Climate Chaos Has Arrived,” by Bill McKibben. In it, the author reports on various examples showing that global warming is indeed a fact: a scientific revelation in September 2006 that reported satellite images showing that the polar icecap is now 20% thinner than historical averages, the increasing frequency and severity of weather–based disasters, and most convincing, historical before and after photographic evidence of the melting of our largest glaciers. Take a look at these photos and say they aren’t a little scary, I dare you!

Grinell Glacier, Glacier National Park, 1911

Grinell Glacier, Glacier National Park, 1911

Grinell Glacier, Glacier National Park, 2000

Grinell Glacier, Glacier N. P., 2000

Pasterze Glacier, Austria, 1875

Pasterze Glacier, Austria, 1875

Pasterze Glacier, Austria, 2004

Pasterze Glacier, Austria, 2004

Rhone Glacier, Switzerland, 1859

Rhone Glacier, Switzerland, 1859

Rhone Glacier, Switzerland, 2001

Rhone Glacier, Switzerland, 2001

Portage Glacier, Alaska, 1950

Portage Glacier, Alaska, 1950

Portage Glacier, Alaska, 2001

Portage Glacier, Alaska, 2001

Showing these “before” and “after” photos side by side really drives the point home! This is scary stuff! Environmental photographer Gary Braasch has made a career of photographing many of the world’s ecosystems, especially in the areas of climatic change and biodiversity. Thanks to people like him, the truth is becoming clearer and clearer. Dramatic photos such as these shots of the melting glaciers provide all the proof I need that the climate is indeed getting warmer! For more on this topic, please take a look at worldviewofglobalwarming.org.

Posted in Photography, Life and Living, The Environment | No Comments »

Time-saving List Examples!

January 28th, 2010 by Matt

This is a great html/css list how–to I used back in 2005. It still is a great tutorial and set of examples.

I have to mention a great article and set of examples that really helped me tame a list navigation problem I was having on a website design I was working on at the time. I was trying to set apart a “current” item on a list as a visual cue as to what page the viewer is on. For example, if a viewer is on your home page, make the “Home” bullet on the list white with a white bar. I was able to come up with a solution, but ran into problems with, of all browsers, Camino. (This used to be a Mac–only browser that compete with Firefox.) Anyway, with my method, it set all visited bullets on the list as white with a white bar! I visited Digital Web Magazine (great site) which led me to CSSVault (another cool site). Finally, following a link from CSSVault, I came across the perfect solution to my problem on Max Design’s Listamatic. This solution, authored by Project Seven, worked perfectly with Camino, as well as with all of my other testing browsers. Thanks a lot Project Seven! And thanks a lot Listamatic!

Posted in The Web | No Comments »

For Better Type Display On PCs Using XP–ClearType

January 27th, 2010 by Matt

As a dedicated Mac user, I’m used to (i.e. spoiled by) the superior display technology that OSX gives me. And, as a web designer, I’ve always been frustrated by the pixelated, “jaggy” display of italic type on PC-based displays running Windows XP. Well, for those less familiar with the PC, here is a helpful (built–in!) little software utility by, gasp, Microsoft called ClearType that will help ban “the jaggies!”

Although this utility is built into Windows, it is set off by default. It also seems to me to be accessed in an almost “hidden” way, so you’re unlikely to run across it unless you are actually looking for it. To activate ClearType, access this FAQ and follow the instructions under “How do I turn it on?” The caveat is that you are not actually able to adjust ClearType settings with this method of activation. Its either on or off. Kind of bogus if you ask me.

Two better methods of ClearType activation that allow “tuning” of the settings are:

I personally prefer the latter. ClearType anti–aliases text, making “the jaggies” appear much smoother. Although designed primarily for laptop users with LCD displays, it also does a decent job at improving displays using traditional CRT (tube) displays. Be aware, though, that this is accomplished by decreasing edge sharpness, (i.e. blurring the edges of the characters) so try it and see if you like it. To me, the better display of italics outweighs the decrease in crispness.

As I stated before, I much prefer downloading and installing ClearType as a windows control panel. Why should you have to access a website to change your settings? I also had some problems on a couple of windows machines where ClearType wouldn’t activate via the website. Downloading and using it as a control panel worked like a charm. My big question is, why doesn’t Microsoft make this software completely accessible, in terms of both activation and tuning, in the first place?

Posted in Graphic Design, The Web | No Comments »

Excellent Web–Based Type Display Utility

January 25th, 2010 by Matt

Another great web design tool I have used off and on since 2005.

Here’s a great utility website from Marko Dugonjić. It’s called Typetester…and you’ll like it! With it, you can compare up to three online typefaces at once, then copy the resulting CSS code for use in your own websites. Cool!

Posted in Graphic Design, The Web | No Comments »

How to Create and Install Favicons

January 21st, 2010 by Matt

A favicon, short for “favorites icon,” is that little icon displayed to the left of the URL in modern browsers, such as Firefox, Safari, Camino, Internet Explorer 6, etc. This file needs to be in a special format, called Windows Icon (ICO) format. The following is a quick “how-to” on building your own. It’s really quite easy!

Create/Install Instructions

  1. Create a 32 pixel by 32 pixel image in your favorite image editor. (You can create a 16 pixel by 16 pixel image, but 32 x 32 will display better for shortcut images, if you are using Windows with I/E. If you aren’t worried about Windows shortcuts, use 16 x 16. More on this later.) Save it as a .PNG file. At this size, the simpler the graphics, the clearer the icon will be. Also, you might want to save it with a transparent background if you don’t want a square image.
  2. Using a software package that allows saving files as .ICO files, such as LemkeSoft’s great GraphicConverter X for the Mac, open your .PNG file and save it as “favicon.ico” in .ICO file format. You can also use Adobe Photoshop, but you’ll have to download a special free plug-in from Telegraphics and use the plug-in to save the file in .ICO format. It’s very important to specifically save your PNG file as a .ICO file. (For details about using the Photoshop plug-in, see the Photoshop Plug-In Procedures section below.) Another great option is to generate the .ICO file online via the FavIcon from Pics website. Simply upload your .PNG file via the “Browse” button and click “Generate Favicon”. It is very easy and seems to work really well.
  3. Once your .ICO file is created, upload it into the top–level directory of your website (the same directory your index.html file lives in) using your favorite ftp software. If you are a Mac user and you haven’t yet tried it, try Transmit from Panic software. Awesome software!
  4. Edit your home page HTML file and add the following lines into the <head> section of the page:

    <link rel="icon" href="favicon.ico" type="image/x-icon">
    <link rel="shortcut icon" href="favicon.ico" type="image/x-icon">

    Note: The “shortcut icon” line is what Windows I/E uses to display a shortcut icon when you drag the URL to the desktop. This is where the 32 x 32 pixel image comes in. It will display much better (clearer) when dragged to the desktop. If you don’t care about this, you can leave this out. The favicon will display fine without it.)

  5. Upload your changed home page HTML file into the top–level directory of your website.
  6. Refresh your home page with your browser. You should now see your new favicon. If you do not, please see the Caveats section below.

Photoshop Plug-In Procedures

(Applies to both Mac and Windows versions.)

  1. Download the plugin from Telegraphics. Copy the “icoformat” file into the “File Formats” folder inside your Photoshop “Plug-Ins” folder. If you already have Photoshop running, make sure you quit and restart Photoshop to activate the plug-in.
  2. Go to File>Save As and make sure you name the file “favicon.ico”. Under “Format” you must choose “Windows Icon (ICO)” from the pulldown menu. (This format will only be available in Photoshop after you download and install the plugin.)
  3. Continue with Step 3 of the Create/Install Instructions listed above.

Caveats

As is often the case with multiple browsers, there are a couple of caveats if the favicon is not displayed:

For Internet Explorer 6: As usual, I/E is the most “flaky” in its display behavior for favicons. It will not display the favicon until you bookmark the page to your “favorites” list. Your favicon may disappear after a period of time and then magically reappear! This is a bug (one of many) in I/E. Either live with it or use a better, standards–based browser such as Firefox.

For Mac Safari: If you don’t see the favicon appear in your browser and you are using the Mac Safari browser, you will need to clear out the icon cache. Download “Safari Icon Manager” from Versiontracker.com (or other shareware software source). There are two versions…one for Safari version 1.2 and one for Safari version 1.3 and above. Use the appropriate version for the browser you are using. Follow these steps:

  • Start up Safari Icon Manager
  • Click on “Empty Cache”
  • Refresh your browser while browsing your home page. You should now see your new favicon.

For all browsers: Try typing a “?” at the end of the URL and refresh the browser. This will force the browser to flush out the cache and read in the new favicon.

Go Do It!

Caveats aside, that’s all there is to it. Give it a try!

Posted in Graphic Design, The Web, How To | No Comments »

More Valencia Peak Photos

January 19th, 2010 by Matt

Valencia Peak Photo

Meadow Full of Clouds

Here are a few more photos of Valencia Peak and the surrounding Montana de Oro State Park. Actually, all of these photos were taken on a couple of days during June and July of 2005. This is a truly special place!

See all of the Valencia Peak series on one page here.

Posted in Photography | No Comments »

« Previous Entries Next Entries »